MMMmmmm Food!

MMMmmmm Food!

Tuesday, November 15, 2011

Homemade Roasted Tomato Basil Soup!!!

What a perfect dinner on a chilly night!  This isn't your normal tomato soup from a can...


You will need:
3 lbs. ripe Plum Tomatoes
Extra Virgin Olive Oil
3 cloves Garlic
1 Yellow Onion
1 tbsp Butter
Pinch of Red Pepper Flakes
1 (28 ounce) can Plum Tomato Puree
1 quart Chicken Stock
Handful of Basil
Kosher Salt& Pepper

***Preheat oven to 400 degrees***

First, cut the tomatoes lengthwise and coat with a generous drizzle of olive oil.
Spread the tomato halves on a baking sheet and season with salt and pepper.
(I forgot to take off the little green spot where the tomato was attached to the plant - probably best to use a knife and take that little section off!  Oops)
(Wow, another tiny mistake - I only had a red onion on hand... you should use a yellow for a lighter onion flavor)  Now is where you would sweat the chopped onion with 1 tbsp butter and 1-2 tbsp olive oil.  After about 5 minutes add the chopped garlic.  Then add the chicken stock and can of tomato puree.
Yum!  This is what they will look like after in the oven for 45 minutes.  
Use a food processor to pulse the tomatoes - it's ok if they are a little bit chunky.  Then add the mixture to the pot.
Chop up the basil and stir it in - then bring the soup to a quick boil - reduce to a low simmer for about 30 minutes.  This will go great with a grilled cheese sandwich!

So good!!!  This would be great if you reduced it even more to a thicker sauce - it's like a bowl of Italian tomato sauce.  Go make this!  It's very easy...

Monday, November 7, 2011

Seared Scallops with Lemon Asparagus Risotto!


Risotto isn't hard to make!!!  It just takes time and care - so try it - you will not be disappointed!

 What you will need:

12-14 diver scallops
1 cup risotto rice
1 yellow onion
1 lemon
1 cup dry white wine
box of chicken stock
1 & 1/4 cup chopped asparagus
2 cloves garlic
1/4 cup parmesan cheese
2-3 tbsp unsalted butter
2-3 tbsp olive oil

 First remove the little rectangular muscle off each scallop - google "cleaning scallops" if you can't find it or don't know what to look for.
 Then pat them dry with some paper towels.
 Now for the risotto...  melt a little butter (1.5 tbsp?) and a couple tbsp olive oil.
 Add the chopped onion first and cook until it just starts to brown - then add the rice and let it toast in the oil/butter.  Keep it moving so the rice does not burn.  
 After about 5 minutes, add a splash of white wine.  The trick to risotto is to keep it moving.  Then when almost all the liquid is gone, you want to add more.  Next add a splash of chicken stock.  Alternate white wine and chicken stock for about 15-20 minutes.  You will see the rice turn thick and creamy.
 After about 10 minutes of cooking the risotto, add the zest of one lemon, two chopped garlic cloves and about 1/4 cup of grated parmesan cheese.
 When the risotto is about 10 minutes from being done, add the chopped asparagus and squeeze the juice from one lemon in.  Turn the heat to low - now cook those scallops...
 Heat a large frying pan with another butter/olive oil mixture - about a tbsp of each - season the scallops on each side with kosher salt and pepper.  When the pan is very hot (just about smoking) add the scallops and do not move them!
 After about 3 minutes, see if they are nice and brown - they should release from the pan to cook the other side.  If they are sticking a little, try to use a hamburger flipper to really get under the crust before turning.
 The asparagus should be cooked but still have a nice crunch.  The lemony risotto goes great with the mouth watering crust on the scallops!  Delicious!


Wednesday, November 2, 2011

Mini Pumpkin Cheesecake Bites!

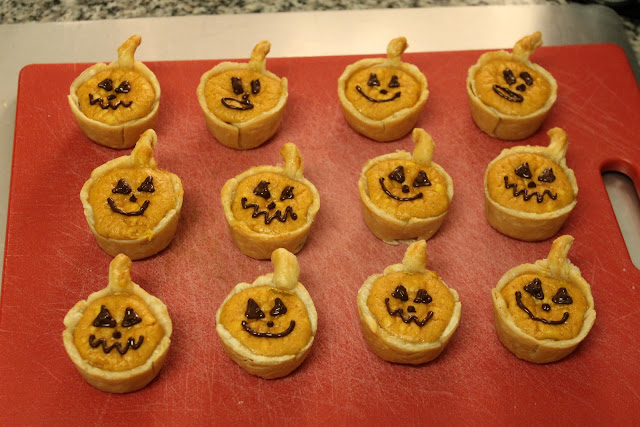
Look at these fun little guys!  They are the perfect, 4-bite taste of Fall - these would be great for a cocktail party around Halloween or Thanksgiving!
What you'll need:

8 ounces cream cheese (at room temp)
1 cup pumpkin puree (not the pie filling!)
1/2 cup granulated sugar
3 eggs (2 in filling, 1 for crust)
1 tsp vanilla extract
box of pie crust (2 crusts in each box)

Preheat oven to 350 degrees
Add all the filling ingredients in a bowl (note - only add 2 eggs - the third egg is for the pie crust which you will see later).
Bring everything together with an electric mixer.
On a floured surface, roll out one of the ready made pie crusts.  It needs to be a little thinner than if you were to just roll it out.  We need to try for 12 circles...
Looking at the size of the mini cupcake pan, I found something that would give me a large enough circle to fit in each cupcake - clearly I didn't roll my crust out enough because I only got 10!  Never you fear - all the scraps that remain can be brought together and then roll that out so you can cut two more circles.
Place each crust round in every other cupcake spot - Then with more of the scraps leftover, use a little to fashion a tiny stem for every pumpkin.  Once all 12 are in the pan, brush the crust with egg white (from the 3rd egg).  This will give the edges a nice, golden-brown crust.
Fill each cup with the pumpkin cream cheese mixture just about to the top of the crust.  Bake for about 15 minutes and then check them - mine ended up taking a few more minutes to make sure the crust was fully cooked - If they don't look nice and golden, give them 3-4 more minutes.
Yummy!  Look how great!  I let them cool for about 5-10 minutes and then use a butter knife or frosting tool to insert down the side, then pop them out.  Repeat the whole process with the second pie crust...
(Makes 24)

Now for some decorating...
This was maybe 1/3 cup semi sweet chocolate chips - warm in microwave for 20 seconds, stir then another 20 second until melted.  Add a tiny dash of vegetable oil if chocolate seems too thick.
Spoon the melted chocolate into a Ziploc sandwich bag - concentrated in one corner.  Snip a tiny amount of the plastic corner so that when the chocolate is squeezed out, it will be a very thin line.
Very easy to make little jack-o-lantern faces!    If you don't want to make these for Halloween - since it is clearly not Halloween anymore...  just leave off the faces!  
If anyone watched the Sandra Lee Halloween special on the Food Network, I really should have put "EAT ME" on a few of these...  hahaha  Enjoy!!!